
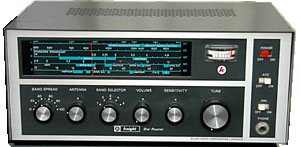
Like a lot of kids, I had the radio equivalent of a Kodak Brownie box camera. Mine looked like this:
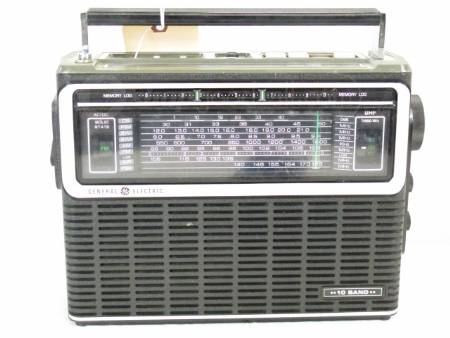
That's a Knight Star Roamer. I also had something similar to this, a portable multi-band radio from JC Penney:
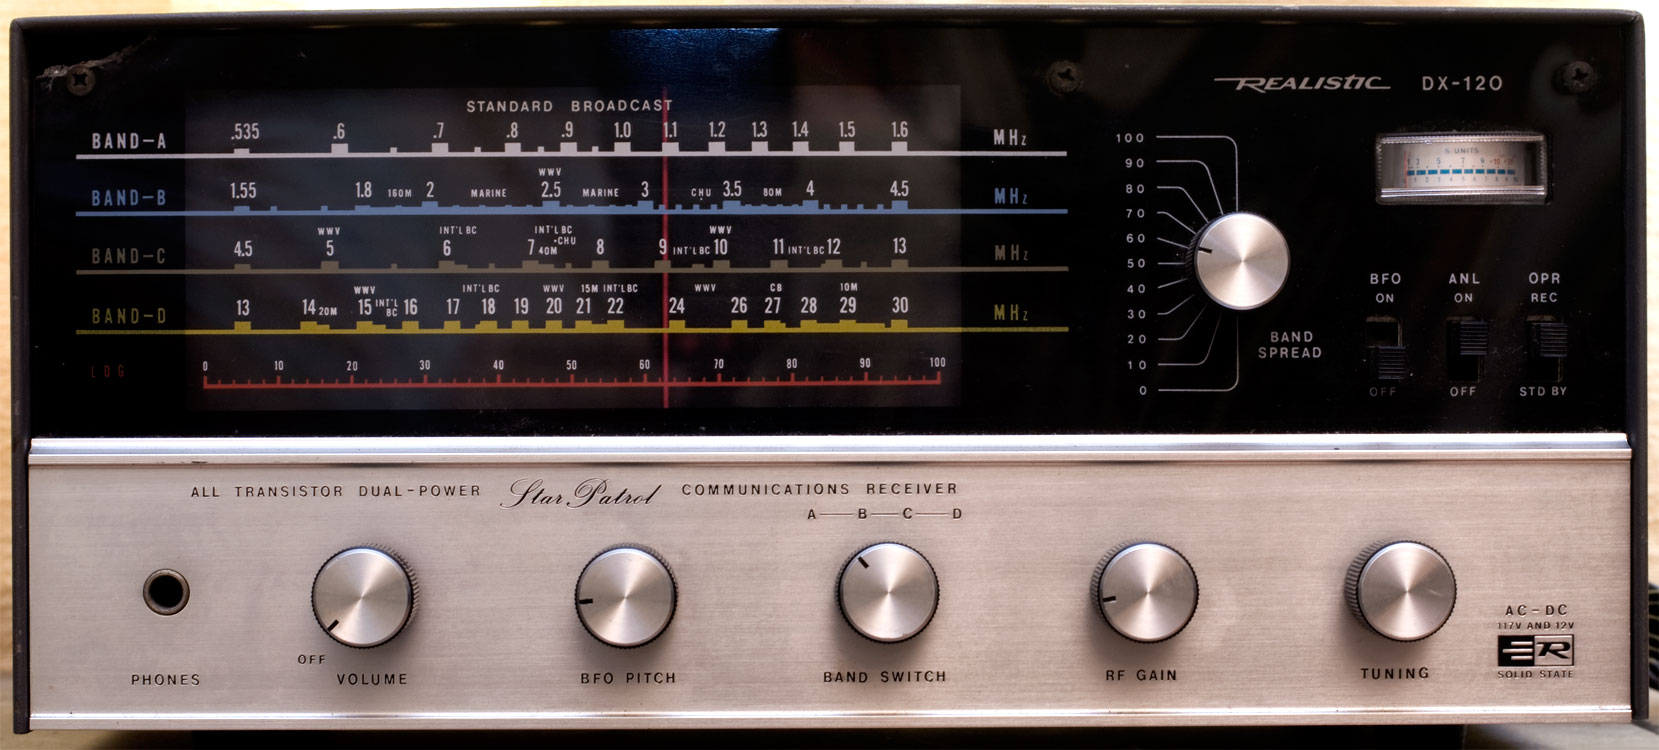
and I still have this guy. It's a Realistic (Radio Shack) DX-120 "Star Patrol":
I always wanted to listen to shortwave—stuff you couldn't get on any garden variety radio in the house. On that old Penneys it was impossible—I was lucky it even picked up broadcast. The Radio Shack and the wannabe Knight actually could. But it was such a pain in the ass.
Listening to Shortwave is Like FishingIt's true. It's a lot of time spent searching, waiting for a bite. Like fishing, if you know almost nothing you can still be successful, but it helps to know what you're doing. If you know the right tackle to use, where the fish are, when they show up, those things pay off. Listening to shortwave is the same.
The Different Kinds of Activity
For the purposes of this discussion, I'm going to break radio activity into five categories and concentrate on two. They are:
Commercial Broadcast: this is the standard AM/FM stuff you can get on any radio. In the US (where I am), the AM band is 540 to 1710 KHz, and the FM band is 87 to 108 MHz. Stations that uses these bands are local to the listener—even though some of the AM stations carry long distances at night, they all cover a relatively small area. Since you can get these stations on any normal radio, we're not going to talk about them.
World Broadcast: aka World Band, and other things. These are similar to commercial stations except that they broadcast on higher frequencies and they often depend on atmospheric skip to cover distances you can't get otherwise. Broadcasters here typically fall into two categories: religious groups (i.e. evangelists) and government organs, like the British Broadcasting Corporation (BBC) and China Radio International (CRI). This is one of the main categories I'm going to discuss.
Amateurs: aka hams. This is the other major category I'm going to discuss. Hams are private parties who are licensed by their national governments and allowed to transmit on certain frequencies. There are two major differences between hams and the others here: 1) hams can't use their privileges for commercial use, which is why they're "amateurs," and 2) hams can't broadcast: one can't sit at a microphone and transmit blindly to whomever may be listening; hams make station-to-station contacts.
Other Voice Transmissions: this would include Citizens Band (CB) radio, Family Radio Service (FRS) radio, other walkie-talkies, wireless microphones, security guard networks, emergency service dispatchers, airport and aircraft, marine and other chatter, wireless telephones, the ordering system at drive-through restaurants, movie soundtrack audio at drive-in theaters, and that kind of stuff. I'm not going to discuss this. If you're interested in picking up those transmissions, you're likely to end up with a purpose-built radio (e.g. CB, FRS) or a scanner.
Other non-Voice Transmissions: this includes garage door openers, WiFi boxes, navigation beacons, and all manner of other things that generate radio frequency transmissions. For us, these are mostly annoyances and sources of "noise."
Antennas
I want to walk a careful line here. There are two things that are important to know.
I say this because it's easy to be intimidated when you're just starting out; someone will rationally explain why you're just wasting your time if you don't have a dipole cut specifically to the frequency you want, with an antenna analyzer and a low-loss feed cable that's carefully impedance-matched to your radio, used in tandem with solid copper ground network buried at least 8 feet deep in your yard, and blah blah blah blah blah. That without all that, you're going to be lucky if you can pick up a 50,000 watt radio station transmitter only five miles away.
1. The better your antenna, the better your reception is likely to be
That's absolutely true. However
2. Any antenna is better than none
 Here are two examples. One: I was inside the house (albiet next to a window) with an old Zenith Transoceanic, nothing special, and I picked up a discussion of cricket results from Radio Australia.
Two (and this one is better): I was playing around with my old National NC-173; the antenna used was a 3-foot clip-lead (a length of wire with aligator clips on both ends) going from the antenna input of the radio to I don't-remember-what to pull it taut. I picked up, among other things, Radio Habana Cuba.
When I was just starting out, and hell, even now, I often get discouraged because I have inexpensive, sub-optimal equipment and some jury-rigged solutions. Yet I can still manage to pick up stations. My point being—don't think you need $5,000 and 10 acres of land to get going, 'cause you don't.
What Are These Antenna Hookups: if your radio has a hookup for an external antenna (and many multi-band radios do), they typically come in two types:
First is the screw-thread type where you hook it up to a co-axial cable, just like televisions and cable-boxes have. You find this on most modern radios and they're meant to be used with 50Ω coax line. Television cable uses 75Ω coax, and that's far more common than 50Ω. Try to use 50Ω if you can get it, but 75Ω will definitely get you going. You won't hurt anything by using the wrong type; but what happens is that you probably won't get as strong a signal using 75Ω as you would with 50Ω, because that mismatch causes some signal loss.
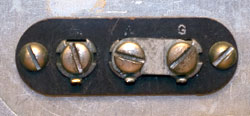
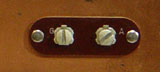 The other type of antenna connection, and you'll see this on older radios, and if you're reading this it's probably what you have, is two or three screw heads. Usually one screw is labelled Ground (GND or just G) and the other one or two say Antenna (ANT or just A).
On some radios you'll also see a little metal bar that can be slipped in to electrically connect one of the two Antenna screws to the Ground screw, and it's up to you on whether to use it or not; it'll depend on what kind of antenna hookup you've got. If you don't have it, just forget I even mentioned it.
In the photos above, the left one shows a 2-terminal antenna (left and center screws) and one ground screw. There's a bar that electrically connects the right-side antenna terminal and the ground. On the left photo, there are only two terminals: the ground is the right-side screw and the antenna is the left-side screw.
Nearly every antenna is connected to a radio using a transmission line (aka feed line). About the only ones I see that connect directly to the radio are on handheld radios (handi-talkies). Everything else is cabled up somehow.
There are three main kinds of feed lines. The first is the Coax line I discussed above. The second is twin-lead, where you have two wires that run parallel to each other and encased in plastic to keep them separated and at the same distance. These are flat and look like ribbon or tape. The last type is just a plain wire, usually insulated. This is usually considered the least desirable, but it will get you going.
In all cases, you want to run a wire from the GND terminal to some kind of electrical ground (e.g. a cold-water pipe). See the section on Ground below.
Hooking up coax to a two-screw (one for ANT and one for GND) system: the easy way is to go to Radio Shack or some other store that sells TV/radio stuff and buy a transformer/converter (aka a balun) that will convert from coax to twin-lead. These are typically in the $5 range. They're about the size of a roll of dimes; there's a coax connector on one end twin-lead wires on the other. Hook this up to your coax cable.
Now you want to identify which terminal is ground and which is the feed. Get an ohmmeter (almost any multimeter will do this) and check the continuity between the outside metal connector of the coax cable (that'll be easy—it's the part that's visible) and the twin-lead terminals. One should have continuity and the other should be dead. The one that has continuity is your ground lead.
Fit one side of the twin-lead under the ANT terminal and the other under the GND terminal. Be sure to get these right.
If there's a metal piece that can connect an ANT terminal to the GND terminal, put it on. You want your coax ground lead and the GND terminal to be electrically connected.
If you don't want or can't buy a converter, you'll have to do it with the bare wires. Cut an end off the coax cable. Cut about an inch off of the outer insulation off and discard it. You should see a layer of what looks like either thin metal foil or tiny braided wires. This is the shielding for the coax and we're going to use it as a ground lead. Whatever kind of metal shielding it is, you want to gather all this up and twist it into a line of wire (cutting it won't hurt it, just as long as you don't cut it off completely. You want an electical connection between this and the opposite end of your coax). This is your ground lead.
Now you'll see a length of milky plastic that's the insulation for the center wire. Cut about 1/4 to 1/2-inch off of that off to expose your center wire. This center wire will be solid. This is your main antenna wire.
You can bend the solid wire, so make a little loop and hook it under the ANT screw. Take the ground (the outer shielding) and put it under the GND terminal. The GND terminal should have two connections now: one to the outer wire of your coax line, and the other to your RF ground (e.g. a wire to a cold water pipe).
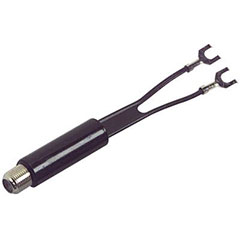 Hooking up coax to a three-screw (two for ANT and one for GND) system: the easy way is to go to Radio Shack or some other store that sells TV/radio stuff and buy a transformer/converter (aka a balun) that will convert from coax to twin-lead. These are typically in the $5 range. They're about the size of a roll of dimes; there's a coax connector on one end twin-lead wires on the other. Hook this up to your coax cable.
Fit one side of the twin-lead under each of the ANT terminals and tighten the screws. That's it. If there's a metal piece that can connect an ANT terminal to the GND terminal, do not put it on. You want the ANT and GND connections electrically separated.
If you can't or don't want to buy the transformer/converter, you'll need to expose the wires as I described above. Put the antenna (inner) wire under one ANT screw and the ground (outer) wire under the other ANT screw and tighten them down. Put the antenna under the ANT screw that's farthest from the GND terminal, and put the ground wire under the ANT screw that's next to the GND terminal. If there's a metal piece that can connect an ANT terminal to the GND terminal, do not put it on (though I don't think it would matter whether you did or not).
Hooking up twin-lead to a two-screw (one for ANT and one for GND) system: Put one wire from each side of the twin-lead under each of the two screws and tighten them down; so one side of the twin-lead will go to ANT and the other will go to GND. It doesn't matter which side of the wire you hook to which terminal. Be sure that the GND terminal still has the wire going to electrical ground (i.e. you'll have two wires going to your GND connection).
Hooking up twin-lead to a three-screw (two for ANT and one for GND) system: Put one wire from each side of the twin-lead under each of the two ANT screws and tighten them down. If there's a metal piece that can connect an ANT terminal to the GND terminal, do not put it on. You want the ANT and GND connections electrically separated.
Hooking up a plain wire to a two-screw (one for ANT and one for GND) system: Hooking up a plain wire to a two-screw (one for ANT and one for GND) system: put the end of the antenna wire under the ANT terminal screw and tighten it down. That's it. You should now have one wire going to the antenna (the ANT terminal) and one wire going to electrical ground (the GND terminal).
Hooking up a plain wire to a three-screw (two for ANT and one for GND) system: put the end of the antenna wire under the ANT terminal screw that's farthest from the GND terminal and tighten it down. If there is a metal piece that can be slipped in to connect the GND terminal to the other ANT terminal (i.e. the one that isn't already connected to anything), use that piece to hook that ANT and GND terminals together.
Using Portable Radio Antennas
There are a variety of antennas you can scrounge off of portable radios. They fall under the "better than nothing" category. Here are some of the most likely contenders:
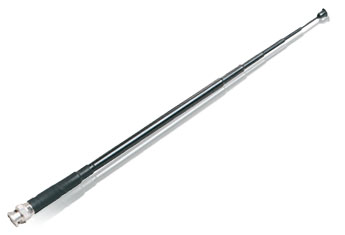 Telescoping rod: these are called whips (actually, any straight rod is typically called a whip). They're cheap and easy to find. They're mainly designed for FM radio (~100 MHz) so they're not very good at lower frequencies. Hook them up using the single-wire method. If you have a choice, the longer the better.
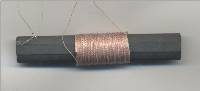 Loopstick: these are found in AM transistor radios, though you can buy them new on the net in different configurations. The AM radio ones are (obviously) designed for medium-frequency AM broadcast (~ 1 MHz), but by all means give it a try.
Old Loop Antennas: old tube radios typically had loop antennas. They were usually built into the back panel of the radio. Like the loopstick, they're designed for MW frequencies but may work for you anyway.
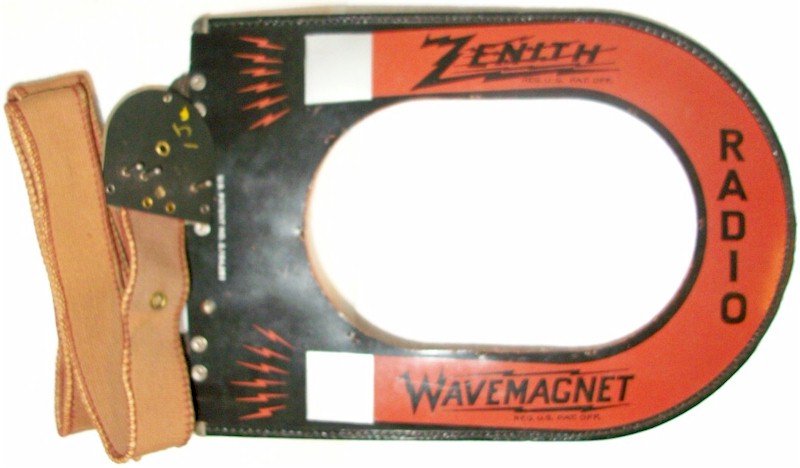 Premium portable radios had loop antennas that could be removed and positioned for better reception; the classic example is a Zenith Wavemagnet. Many wavemagnets were designed for AM broadcast, but if you can get one off a Zenith Trans-Oceanic, those were meant for shortwave as well. Basically any "shortwave" radio of that era ought to have a decent loop antenna that you can try out.
With all of the antennas above, you'll need to play around with their orientation to see how well they pick up. The loop and loopsticks in particular are very directional and there is no one good orientation. So if you're scanning the dial, you may find that one orientation works best for one station but another orientation works best for another, even if they're on the same band.
Ground
The term "ground" as it is used in the United States can mean several things, so it can be confusing. In our case, "ground" is a way of completing an electrical circuit by giving radio waves a way to get back to their source, albiet in a weird way. Like any form of electricity, they come from a source (albiet through the atmosphere), through your radio, and they want to go back. This is usually called "RF" ground, as opposed to electrical power ground.
Do NOT hook the antenna ground to your home's electrical current "ground." Power ground is different and it's best to keep them separate. Your radio's antenna input and ground expects to get mili or micro-watts of current passing through it. Residential AC power will do all kinds of damage—not to mention be a huge safety issue. Treat them as two totally different systems.
Back to RF ground. You say: but my handheld radio works great and it isn't hooked to "ground" anywhere. And that crappy tabletop radio that was my aunt's doesn't have an actual earth-ground connection. And neither does the one in my car.
True. But regular radios are usually dealing with big signals; shortwave radios are almost always dealing with weak signals, and they need all the help they can get. Providing a quality ground can help a lot.
If you read much about grounding in ham literature, they make it complicated. Making good grounding rigs and burying them at the proper depths, et al, can be almost as complicated at designing high performance antennas. Nobody (reasonable) expects a kid with a Knight Star Roamer to sink an 8-foot ground rod and run a heavy cable from it to his radio.
Making "proper" grounds is beyond the scope of this article. This is meant to be quick and easy and get you going. Besides, we're receiving, which is extremely low power. Transmitting ground handles a lot more electrical energy.
Nearly every decent shortwave radio will have a terminal on the back that's marked Ground (or equivalent, such as "earth"). The exceptions are portable multi-wave radios like Zenith Trans-Oceanics. But if you do have a ground connection, try and use it.
There are two classic ways to ground a radio. One is to run a wire (regular old stranded hookup wire is fine, but the bigger the better) from the Ground terminal on the radio out a window, door, through a wall, or whatever, attach it to a metal pipe or a stake, and drive it into ground (i.e. soil). Growing up, my crystal radio's ground was a wire snaked through a window to a stake in the yard outside. The advantage of this method is you know you've got a direct ground.
The other classic way is to run the wire from the radio to a cold-water pipe in the house, e.g. a drain pipe under a bathroom sink. You have to do some checking for this one, though. In the old days you could count on the house plumbing being some kind of metal, be it copper, galvanized steel, even lead would work. But a lot of modern homes use PVC plastic which doesn't conduct. Even if you've got copper in the bathroom, it could hook up to PVC somewhere else before it goes underground, so it doesn't truly ground.
If you get interested in radio, upgrading your ground system is a good investment. If you set up an outdoor antenna (which lightning can strike), a good ground system can save your equipment, your house, maybe even if your life.
Listening to World Broadcast
This is really what most shortwave radios are really meant to receive—the three radios I pictured above should manage it. Ham radios are another thing, as we'll see later.
World band is a strange thing. On the one hand it's dying because the internet makes it easier to get the information; you can download a high-quality, pleasant-to-listen-to podcast and play it whenever you like, or listen to a stream. Whereas on the radio, you have to find out when and where the broadcast is, try to pick it up (which may depend on the local atmospherics), and if you do, you may have to listen to it through lots of static, noise, fading and other interference.
So on one hand it's dying, but it hasn't been killed outright because radios are cheap, they often don't require a lot of power to run, and they don't need broadband or an internet connection. So if you're living in a hut in the middle of nowhere, you can pick up broadcasts that you can't get any way else.
Even though the BBC World Service, the Voice of America, and others have drastically cut back or ended their broadcasts, you can still pick up a variety of things out there.
So which fish are out there?
 Two things you can do. One is you can just hunt for stuff, or you can compile a list of things you're looking for, find out when and where they broadcast, and look for them. The latter is actually fairly easy to do: some digging on the internet will ferret out a lot of them. For instance, here's the North American schedule for China Radio International's broadcasts.
In print, try WRTH or the magazine Popular Communications. My favorite, Passport to Worldband Radio, is now defunct but even an older edition won't be completely obsolete. If you can find a station that looks interesting, you can follow it up with an internet search to get the current particulars.
Here's an interesting wesbite: Short-wave.info You can do a variety of searches based on who the broadcaster is, or what frequency you want, and it will tell you what it believes are broadcastig at the time, and where the transmitter is located (in my case I probably don't want to kill myself trying to pick up a transmitter located in Nepal).
If you have an Android machine, check out Stephen Cooper's Shortwave Radio Schedules app. I don't have any Apple OS stuff, but I would bet there's an app for iPhone/iPad/etc. as well.
UTC
 World broadcast radio almost always uses world time, aka Greenwich Mean Time (GMT), aka Universal Time Coordinated (UTC), aka Zulu. UTC is the actual time in Greenwich, England, where the prime meridian passes (unless you're a Francophile...). Using this single time means you only have to know the difference between your time zone and UTC, instead of your time zone vs. the local time of whomever's broadcasting. For example, I'm in the USA and my zone is Pacific, so I'm 8 hours behind GMT (except during !@#$%^&ing daylight savings time, when I'm -7).
Personally, I have a cheap quartz wall clock that I set to UTC. It's beautiful because UTC doesn't have daylight savings time, so I only have to reset it when the battery dies.
When you see the time and frequency listings, chances are they will be in UTC. If not, they should make it obvious what time zone they're using. A good example is the schedule for China Radio International: they list local Beijing time, UTC, and Eastern Standard Time for the USA.
Target Areas
It's useful to look at the schedules to see where they're broadcasting to. In my case, I'm interested in broadcasts to North America, because the chances of my picking up broadcasts aimed at Africa are pretty remote. I can't get regular Voice of America broadcasts anymore because they discontinued their North American coverage. If I want the VoA, I either have to try to pick up something aimed at another part of the world (good luck with that) or go the podcast route from the internet.
The Hunt For Red October
One of the things that makes World Band special, and also infuriating, is that it's highly dependent on atmospherics and it's unpredictable. Just because a show is supposed to be on doesn't mean you'll be able to pick it up. And a show that came in loud and clear last night isn't on at all tonight. What makes shortwave different from local commercial broadcast is atmospheric skip.
In short, what happens when KFI (a local commercial broadcast station) broadcasts, the radio wave spreads out along the ground like floodwaters. This is ground-wave propogation. But at night, some of these waves head up into the sky (sky-wave) and reflect off the ionosphere, and they hit the ground far over the horizon.
Sky-wave skip varies with atmospheric conditions and radio frequency; different combinations skip at different rates. In general, skip is poor during the day, improves at sunset, is best in the early evening and then craps out late-night. The maximum useful frequency (MUF) starts out high and drops as the evening progresses.
What this means for you is that what you can and cannot pick up on your radio will vary with the time, the season, and weather conditions. So just because CRI says they're broadcasting on 11.885 MHz doesn't mean you can get it just because your radio is capable of tuning to that frequency; you might be able to get it tonight but not tomorrow night. Who knows?
Bands
Radio frequencies are grouped together into "bands." The term is generic so a "band" is whatever collection of frequencies is useful to you when you're talking about it. So there are big "bands" (e.g. the FM broadcast band from 87 -108 MHz) and there are tiny bands (the width of a morse code transmission, 50Hz); there are pricely defined bands (the US amateur 20 meter band: 14.0 to 14.35 MHz) and vaguely defined bands (tropical). You'll see the term "band" used a lot; it's a just a way of grouping frequencies together for the discussion at hand.
Which Bands Are Open Now?
So back to atmospherics and the fact that even though your radio may say it can pick up frequences from 500 kHz through 50 MHz, you're actually not hearing anything except noise on most of them. What happens is that at any given time, some frequency bands are "open," which means you can pick up the radio signals, and some are "closed," which means you can't. Open bands are the ones where the signals are skipping off the ionoshere and hitting your antenna. Closed bands are the ones where the signals are going off into space or some other area of the earth.
You can sit there and tune up and down the dial until you pick up something, but that gets tedious very quickly. Electronic tuning isn't so bad if you can hit a "seek" button, but even then you're likely to stop at lots of "noise" that isn't anything you'd want to listen to.
Luckily, there are some strategies to narrow things down so you're not fishing in empty parts of the lake.
If you're in the USA, try tuning in WWV or WWVH. They broadcast simultaneously on 2.5, 5, 10, 15 and 20 MHz. (WWV is in Fort Collins, Colorado; WWVH is in Kauai, Hawaii). They broadcast the current time 24-hours a day, every day; there's a tone component (a seconds tick) and a voice component where they announce the actual time.
If you can pick up WWV on a particular band, then other nearby frequencies are open. For example, if you can pick up the broadcast on 15 MHz, you should be able to pick up other stations in the viscinity. If you can't pick up WWV on 15 MHz, the band may be closed to you.
This is not a sure-fire bet, but it's a good place to start. If you're outside the USA and can't get WWV, see if you can locate the local equivalents for your area. A lot of areas of the world have beacons that transmit on a specific frequency; if you can hear it, the band ought to be open.
Another good rule of thumb is that world band broadcasters tend to cluster near whole-number frequencies. In other words, start at 5 MHz and move around there. There are number of broadcasters who cluster around 6 MHz.
Check out Short-wave.info and see which frequencies people are clustering around. As I type this in the summer of 2013:
the hot areas are around 4, 5, 6 and 7 MHz.
Between 7.5 and 9 MHz is dead,
but things pick up again around 9.2 up to 10MHz,
around 11.5 to 12.2 MHz,
from 13.3 to 14,
from 15 MHz to 15.8,
from 17.4 to 17.8,
a little around 19 MHz,
and again from 21.4 to 21.8 MHz.
If you know which bands the broadcasters use, that saves you having to hunt for broadcasts in empty spaces (actually they aren't empty—you can pick up all sorts of "noise."). If you can't pick up anything the area, those frequencies are closed—try another.
Holy Moses—the Quality is Terrible!
That is often true. We get spoiled by commercial radio with its clean signals and receivers that are optimized for it. World band, partly because the signals are weak and because of atmospherics, is especially prone to static, noise, interference with adjacent stations, and fading. You can do something about some of it, but generally you have to live with the fact that it's not going to be high quality. If that annoys you, then you should pursue getting world band shows from internet podcasts or high-quality streaming. Personally, I find that I mentally filter out much of the ratty noise and I just get used to it after awhile.
I will discuss some of the ways to deal with noise in the Equipment section below.
Amateur Radio (Hams)
There are several fundamental differences between amateur radio stations (hams) and broadcasters, but the one that matters most is this: amateurs don't broadcast. They aren't allowed to except in emergencies. Amateurs make station-to-station, two-way communication connections. The only time they "broadcast" is when calling to make contact with another station.
Listening to hams is a different experience for a number of reasons. One of the advantages is that they have very strictly defined bands that they are allowed to operate within, and it's relatively easy to find out what they are. In the USA, check out the color chart provided by the American Radio Relay League (ARRL). For other areas of the world, you'll have to do some internet searching or ask a ham. A lot of the bands are common, but not all.
World band broadcasts typically use AM (amplitude modulation) transmissions, just like the commercial AM broadcasters locally. A few hams use it, but far more use other modes: CW (meaning continuous wave, which is typically morse code), other data formats (which may sound like morse), FM at high-frequency bands (typically 2-meters and shorter), and Single-Sideband.
American hams generally agree to follow a "band plan" whereby various bands or frequencies are allocated for a certain mode; for instance, 1.8 MHz to 2.0 MHz is supposed to be used by CW only. In reality, nobody's truly legally required to follow the band plan; but hams who value not being ostricized are careful to stick to them.
The advantage of the band-plan is that it can help you zero in on what you want to hear. If you're interested in listening to morse, you can look up the plan and see where morse is encouraged. If you want to listen to full AM, you'd look on the band plan for AM (you'd start with 3.885 MHz or 7.290 MHz).
Single Sideband (SSB)
The majority of hams who transmit voice use either FM or SSB. FM is in the VHF and UHF range, and typically not picked up by the same kind of radio that will get world band. That leaves SSB.
SSB became big in the 1950s and afterwards as a way of dealing the overcrowding of the ham bands. I'm going to explain SSB very simply: you take an AM signal and cut it in half; there's an upper half and a lower half—these are sidebands. You discard the half you don't want and transmit the other; the result is you can get almost twice as many people on the same band as you could people who were using full-AM.
SSB, therefore, is upper sideband (USB) and lower sideband (LSB). Nearly any radio that can handle SSB can handle both USB and LSB—there should be a switch, button or setting somewhere to allow you to select which one to use.
Some radios cannot handle SSB at all; this includes many old communications receivers (i.e. boatanchors) built prior to the 1950s, some even afterward; most consumer-grade multi-band radios, including nearly all of the Zenith Trans-Oceanics (except the Royal 7000), and even many world-band radios sold brand new. You have to be careful to check the specs on the radio you're interested in. Examples: the Grundig G3 and the Sony ICF-SW7600GR can, but the C.Crane CCRadio-CW needs an accessory and the Tecsun PL-380/380 don't do it at all.
Radios which are capable to demodulating FM across the entire spectrum can be used for SSB; but this is an uncommon feature. Most makers only bother to demodulate FM on the bands where FM is likely to be found.
Upper or Lower Sideband?
Once you find a transmission you think is in sideband (it would sound like a voice that's badly distorted--typically described as a quacking duck sound), the question is which sideband? This is fairly easy. If you consult the band plan, it will tell you whether people are using USB or LSB in that band; the general rule of thumb, however is that LSB is used below 10 MHz (30 meters) and USB is above it. Worse comes to worse, just switch back and forth and see which works.
SSB is half the bandwidth of full-AM, and that means the audio fidelity is lower. If you think AM is flat, listen to SSB for awhile and then come back; AM sounds almost symphonic.
Where Are the Hams?
Picking up amateur transmissions is typically tougher because a) they usually don't keep regular schedules, b) they usually use far less power than world band transmitters, and c) a lot of hams use directional antennas, so instead of broadcasting to a wide area the way world-banders do, they often aim their signal at a relatively small target. This focuses transmission (and receiving) efficiency in one area but it takes away from everything else. If you have a ham transmitting on a narrow beam, you're going to have to be situated in that beam's path or you're not going to get anything. It's also quite possible that you'll only hear one side of the contact; you'll get whomever's closer or the gods of ionic-skip favor.
Citizen's Band (CB) Radio
 In the USA, the CB band is between 26.965 and 27.405 MHz (other countries which allow their own version of CB are around the same frequency range), so most radio which can pick up world broadcast can also pick up CB.
CB is channelized, which makes their radios very easy to use; they pick a channel from 1 to 40 and communicate on it; each channel has an assigned frequency, just like television. It makes it far easier to use, easier to remember where you are and where you want to go, and it makes it harder for people to broadcast in-between channels and create interference.
If you're interested, do a google search or look on Wikipedia, and you can find a chart that will tell you which channel is assigned to a particular frequency.
CB transmissions can be AM, USB and LSB, just like hams. Generally, AM is used on channels 1-35. Channel 36 is a LSB calling channel (meaning you call for a contact and agree to move to another channel). Channels 37-40 are USB. So if you're scanning the CB band and you're trying to determine which mode people are using, try that as your starting point.
There are a couple of problems with CB and they're related. One is that by law they are low-power (e.g. 4 watts AM and 12 watts SSB) so they don't have a lot of range; they were designed for local contacts. The other is that many of the transmitters are mobile. So a pair of truckers travelling on the interstate may be able to chat all day long, but you're only going to hear them when they're nearby.
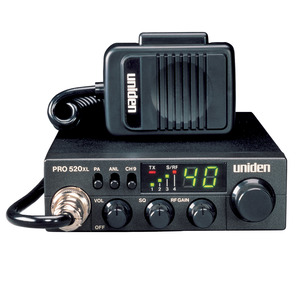
Because of channelizing and ease of use, and their relatively low cost (you can get some decent looking rigs for under $50), most people who want to listen to CB will simply buy a purpose-built CB. Match it with a CB antenna that's optimized for that band, and it'll likely outperform a decent multi-band radio with a multi-band antenna.
Interference
Also known as QRM, or as I call it, crap. To be fair, there are a lot of sources of noise that you don't care about that have a perfect right to be out there: CW and data modes (if you don't care about them), amateur television and such. There are also the more annoying ones: beacons and navigational aids (because the sound is often unpleasant to listen to). There's straight-up, no-arguments noise such as atmospherics (static). And there are what hams call spurious emissions.
Yuck. Spurious emissions are things that should not be there but are anyway. A transmitter, for instance, not only creates a signal at its target frequency, it creates several other "harmonic" frequencies as well; one job of the transmitter is to filter those out before they get to the antenna (in reality they don't achieve 100% rejection). But there are transmissions coming from ulitity power lines and transformers, from all those WiFi and wireless gizmos around the house, any remote control than uses radio frequency instead of infrared light. And lights—a lot of flourescent lights create noise, so do some touch-lamps. A refrigerator might do it when the compressor turns on (refrigerators are the same technology as air conditioners: they don't run constantly).
Here's a great one. I was listening to my old National NC-173 in the garage and kept getting noise from something, but we couldn't figure out what. The Old Man finally found it; it was an automobile battery trickle-charger being used to keep a car battery from dying while not in use. Why would that put out RF? Dunno, but it did.
There are ways of dealing with interference, some more effective than others. Internally (to the radio), there may be some ways to limit interference. Externally you can sometimes add filters to the antenna to reject anything you don't want and let in only the ones you want. The best way, if you can, is to find out what's creating the noise and put a stop to it.
Equipment
WTF is General Coverage and This HF, VHF, UHF, Alphabet Soup Stuff?
"General Coverage" is a term for a radio receiver which picks up everything between AM broadcast (around 500 KHz) up to 30 MHz. You don't see the term "general coverage" much anymore, but it used to be a popular buzzword.
Frequency "ranges" are large groups that are collected together just for organizational purposes. There are two basics to remember: the number 3 and powers of ten. Every time you add another zero (a power of ten), you go up another range.
So it goes like this:
Tremendously Low Frequency (TLF) - 0 to 3 Hz (I don't make this up)
Extremely Low Frequency (ELF) - 3 to 30 Hz
Super Low Frequency (SLF) - 30 to 300 Hz
Ultra Low Frequency (ULF) - 300Hz to 3 KHz
Very Low Frequency (VLF) - 3 to 30 KHz
Low Frequency (LF) - 30 to 300 KHz
Medium Frequency (MF) - 300 KHz to 3 MHz
High Frequency (HF) - 3 to 30 MHz
Very High Frequency (VHF) - 30 to 300 MHz
Ultra High Frequency (UHF) - 300 MHz to 3 GHz
Super High Frequency (SHF) - 3 to 30 GHz
Extra High Frequency (EHF) - 30 to 300 GHz
Tremendously High Frequency (THF) - 300 GHz to 3 THz
and beyond there be dragons.
You can tell that LF, MF and HF are from the early 20th century.
Modern "general coverage" receivers are often called HF sets, at least by hams, because they cover up through the HF range. Most world band transmissions are are in the HF range because that's were skip works best. UHF and higher are more line-of-sight, which means you want to put the transmitter on a high point and keep obstacles like hills out of the way. If you live in an area that's flat, you may find that the transmitters are located all over the place, and you might have needed an antenna rotor to point to the transmitter you wanted to pick up. In Los Angeles, most of the VHF/UHF transmitters are on Mount Wilson, where they can "cover" the region. That's always fun because every 20 years or so there's a massive brushfire that burns Mount Wilson, and most of the TV and FM radio stations get knocked off the air entirely or have to go to weak backup transmitters located elsewhere.
Knobs and Switches
Multi-band radios vary greatly depending on their quality. Generally the cheapies are most like a regular radio: they have the same controls: off/on, volume, tuning and (maybe) tone and that's about it. Better radios add features that give you more control, but they also make things more complicated.
Shortwave radios in particular benefit from the added controls because reception is more difficult. Here are some of them:
Bandspread: (not to be confused with bandwidth, which is an entirely different concept) this is really a fine-tuning control. One of the problems with tuning across a huge range (like 0-30MHz) is that if you make the main tuning control knob move quickly, then it becomes difficult to make fine adjustments on weak stations (or even moderate ones); but if you make the tuning more sensitive, you end up with tired fingers from spinning the knob just to move across the dial. So what you often see is a regular tuning knob that makes the major changes, and a bandspread knob for fine work. The idea is that you use the tuner to get you in the neighborhood and then use bandspread to home in on the signal.
Bandspread controls sometimes have their own frequency dials, but inexpensive models will just have a knob with a pointer and an arbitrary scale (say from 0 to 100). If you have a calibrated dial, the idea is that if you set the main tuner to a special place, then the bandspread dial will be synced and you can read the actual frequency you're tuned to. With an arbitrary scale, you just tune until you get your station and you don't really care what the exact frequency is.
The way I do it is that I usually set the bandwidth in the middle of the scale, use the main tuner to get me close, and then use the bandspread tuner to pick out the signal. If I want to know the exact frequency I'm on—for world band broadcasts, if I can identify the program I'll look it up on the internet. for ham, I just have to do my best and figure the best I can get is close. Most old radios are not perfectly calibrated and analog dials are, at best, close enough, especially where casual listening is concerned.
AF Gain: gain is an engineer's term for amplification, and AF means audio frequency, so this is really just a fancy term for the audio volume control. On a normal radio it's simply called volume.
It's important to distinquish this from the RF Gain control because they often seem to do the same thing from a listening standpoint. The RF gain amplifies the radio signal early on; the AF gain amplifies the audio signal after it's been processed—at the final stages.
 RF Gain (aka Sensitivity): gain is an engineer's term for amplification, so what you're doing is amplifying the radio signal right as it entered the radio from the antenna. Boosting the power of the signal early makes it easier for the radio to process it further along; but like anything good there are drawbacks as well. When you amplify the RF signal you also amplify all the noise and interferance with it. So you don't just crank the RF Gain as far up as it will go. Ideally you want to amplify it as little as possible—just enough to give you what you need.
I use the RF and AF gain controls together (when my radio has them); what I do is turn the RF all the way up and start tuning, and I back it down when I get a signal. When I've tuned in as well as I can, I then do a balancing act between the RF and AF gain controls where I try to use as little RF gain as possible and still get a good sound. You don't have to do it this way—running the RF gain hotter than you need doesn't hurt anything, it just amplifies the background noise as well. A lot of this is personal preference.
Selectivity (aka Q): this is tougher to explain. It deals with tuning. It's easy to think of the radio as having very selective hearing: it hears that one frequency it's tuned to and is deaf to everything else around it. Yes—but not quite.
In reality the radio hears the target frequency best, but it hears adjacent frequencies too. It hears very close ones pretty well, somewhat close ones fair-to-middling, and father than that it hears them like a mothers' voice calling it to come in on a summer's night. There's a fall-off in how well it hears adjacent frequencies. How steep is the fall off, and how far away are the frequencies it hears? That depends.
Tuners have an aspect called Q, and in this case Q tells you how well it hears adjacent frequencies and far away they can be and still be heard. The higher the Q, the better it hears its target frequency and the sharper the falloff is as you go away. With a high enough Q, the tuner would hear only that one single frequency and be deaf to all others. The lower the Q, the less well the radio hears its target frequency, but it hears a wider range of adjacent frequencies.
This is also called selectivity, as in the tuner's ability to select only what it wants and ignore everything else. The higher the selectivity, the better it hears its target frequency and ignores everything else around it. If you have a lot of stations jammed next to each other, selectivity is a wonderful thing.
But like everything in life, selectivity is a trade-off.
An advantage of high selectivity (or Q) is that it makes tuning easier because stations tend to "snap" in. Let's say we're looking for WWV at 10 MHz and our Q is such that we can only hear our target frequency plus-or-minus 10 KHz. As we're spinning the dial, we won't hear WWV until we're right on top of it, but when we get it it will come in great (relatively speaking). If the Q is too tight, it's really easy to pass over it and miss it. Likewise it may be tough to fine-tune enough to land on it.
Let's take the opposite approach and lower the selectivity to + or - 200 KHz. Let's say we're tuning up the dial looking for WWV. Now WWV just kind of rolls in slowly—quiet at first and then gradually peaking and then rolling away as we tune past it. In that respect, having low selectivity makes it easier to find and tune in our station; but we also gather in all the other stations (and noise) that we can also hear as well. Stuff we don't want to hear.
So selectivity is really a compromise between being broad enough to make tuning gradual but sharp enough to isolate the staton you want and reject as much of everything else as possible.
On all radios (including those which do not have a selectivity or Q control), the design engineers made the compromise based on what they thought was good enough. But if there's a selectivity dial, you can adjust it to suit your needs.
Like most things, once you get some experience you'll figure out what works best for you. But initially try this: set the selectivity on the low side while you're searching for station. Once you find your station, tighten up the selectivity as much as you can to get rid of the surrounding noise and focus on your target. When you want to look for another station, back the selectivity down a bit for ease-of-tuning.
Automatic Gain Control (AGC) (aka Automatic Volume Control (AVC)): gain is an engineer's term for amplification. The idea here is to let the radio look at the signal and make the gain adjustment on its own rather than making you do it; if the signal is loud, it backs the gain down; if the signal is small, it runs it up. If you don't have an AGC/AVC switch (and most radios do not), it means the radio runs it all the time and you simply don't have the ability to turn it off.
AGC is a good thing to leave ON because the radio can react faster than you can; it's also decent for dealing with fading, which is a common shortwave problem (the signal strength fades in and out over time). Being able to turn it OFF is useful if you have to align the radio (alignment is a variety of internal adjustments and calibrations).
Automatic Noise Limiter (ANL): this is an attempt to filter out interference that typically shows up as spikes of noise that are much louder than the normal signal you're listening to. This is a good one to leave ON.
Automatic Frequency Control (AFC): you see these on old FM radios or multi-bands with FM capability. Older FM radios had a nasty habit of drifting off station over time, and the AFC helped keep the station locked in. Turn it OFF when you're turning and ON once you've found a station you want to stick with.
Beat Frequency Oscillator (BFO): this is used if/when you want to listen to morse code transmissions, and even then it's optional. The BFO provides an internal audio signal which gets mixed into the audio output of the radio; when you mix the two signals you change the pitch (or tone). BFOs are variable, what you can do is change the tone of those dots and dashes to something you find pleasant to listen to, or something that's easier to pick out from the background noise. For voice transmissions, leave the BFO off. It won't hurt anything to run it, but the noise is awful.
Sometimes BFO is one control (off/on/tone), but sometimes it's two—one for off/on and a separate one for tone. It works the same way, it's just two different ways of doing it.
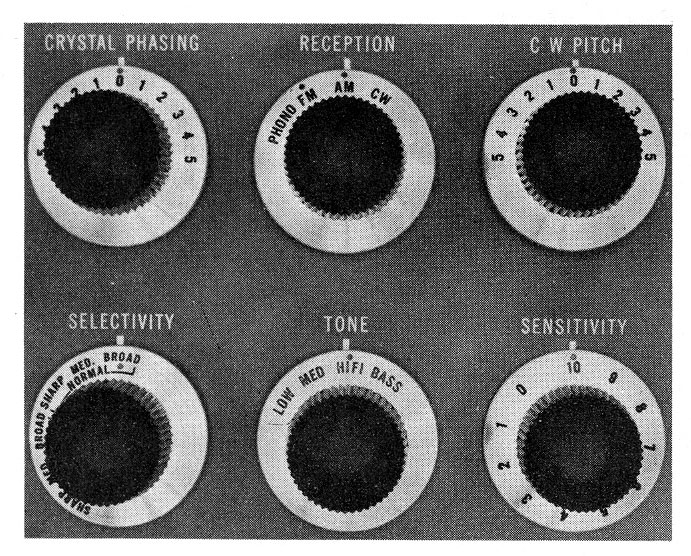
Crystal Phasing: this is another one you use only for morse code. It's a way of dealing with morse-code transmissions that are very close together. Morse doesn't take much room on the spectrum so they can be packed close together and coexist. But if you read the explanation I gave above about selectivity—it also means it can be hard to separate out the ones you don't want to hear. To use this control, you do your best to tune in the one you want and adjust the phasing to minimize any others around it.
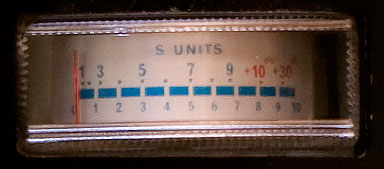 S-Meter: this is a signal-strength meter, and often found on expensive and crappy radios alike because meters are cheap but they look impressive. They are usually tied in to the AGC circuit and read the reverse of the amplification required; a lot of amplification means you have a weak signal so the S meter reads low, and vice-versa.
S-meters can be useful for tuning since you've got a visual indicator rather than just hearing the sound; and it gives you a reference for comparisons (station XYZ had a signal strength of 3 while station ABC had a signal strength of 5). Hams typically report received signal strengths as a way of providing useful feedback to the transmitter.
On expensive, high-quality equipment where the S-meters can be adjusted, they can be valuable. But for this, I find them to be largely useless. But they look cool.
The Log Scale on the Tuning Dial: analog dials are never as precise or accurate as we would like them to be, and the smaller the dial, the worse the problem. Hams, particularly transmitters, have to know exactly what their frequency 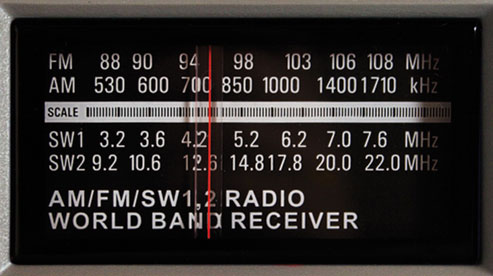 is; but for listening, it's mostly about having a general idea of where you are. If you pick up a world band broadcast, for example, and if you can identify the show, you can look it up and find out the broadcast frequency. Or usually they'll announce the frequencies they broadcast on at the end of the show.
Regardless, there are times when you may want to make an accurate note of where you are on your dial. Let's say you want to tune WWV at 10MHz, but when you do you find out that the pointer isn't at the 10MHz mark, it's off a bit. What happens next time you're hunting for WWV? You can get into the area, but you're not real sure where it is.
So a lot of manufacturers put in a scale that has nothing to do with frequencies. Often it's called LOG but it may be something else (it's called "scale" in the photo above). What you do is count the hash marks and record that; it gives you a much more precise dial position than you get otherwise. Thick hash marks are 10s and thin ones are 1s. So using the photo above, I'd record that as position 48. Next time I want to find that frequency, I'd go to 48 first and start looking. It beats trying to figure out what frequency I'm on just using the dial.
Receive/Stand-By: you don't find these on portables, but they're common on desktop models, particularly the older units. Used to be that receivers and transmitters were separate units, so you needed an easy way to cut the audio when you transmitted so you didn't get audio-feedback through the microphone (feedback is that tremendous, high-pitched squeal you often hear when people are setting up public address systems. The microphone hears the sound from the speakers and puts it back into the system, ad infinitum). Having a switch on the front is a quick, easy, low-tech way to cut the speaker audio. The better units usually have a plug in the back that can be hooked to a transmitter so the audio will cut as soon as the microphone button is pressed.
Since transceivers (transmitter and receiver in one unit) took over in the 80s, receive-only radios are typically used alone, so the feature disappeared.
If you have a receive/stand-by switch, leave it on Receive unless you purposely want to cut the speaker without touching the audio volume knob.
Antenna Trimmer: without getting very techinical: the antenna, the line connecting the antenna to the radio (called a transmission or feed line), and the radio itself each have an electrical property called impedance. Every time the impedance between things changes, you end up with some signal loss: the greater the difference, the greater the loss. So anything you can do to minimize the differences (called impedance matching) will increase the effectiveness of your signal-gathering system (i.e. the antenna).
The trimmer control is an attempt to adjust the impediance matching at the radio end of things. The good news is that this is easy to do. When you find a signal you want to hear, adjust the antenna trimmer until the signal is as loud as it gets, and then you can adjust the RF sensitivity. It's best to adjust the timmer first and then make your other adjustements, since a stronger signal makes it easier for the everything else the radio does down the line.
Dealing with Problems
Of which there are many.
Fading: this is where the signal gets louder and softer over time; it's not fast—the cycle is usually over minutes, not seconds or fractions of seconds. It's especially annoying because you find a good station and then you lose it. You tune to something else and you lose that. Then you find the first station again and it's great until it's gone again. Or you have to ride the volume knob because it's soft and then it threatens to break windows and then it's soft again, and the AVC doesn't seem to be doing anything.
My research hasn't come up with any good remedies for fading other than switching the AGC/AVC on; it's just something you have to live with.
Near-Station Interference: commercial broadcasters on both the AM and FM bands (i.e. your local stations) are regulated by the FCC and allocated frequencies far-enough apart that they shouldn't interfere with each other. But when you're picking up skywaves, it's very possible to pick up multiple station on the same or close-approximate frequencies. If two stations are on the same frequency, there's not a lot you can do. If one station is much louder than the other, try reducing your sensitivity to "lose" the lesser station. If you've got one station on your target frequency and another next door, try tightening up your selectivity. You may not be able to get rid of it, but you can reduce the interference.
Being Swamped by High-Power, Nearby Stations: this depends on who's transmitting. This often happens if you live near a commercial broadcast transmitter, but could be a ham or CB station nearby.
There are a number of antenna filters you can buy that are designed to reject this stuff (look at ham suppliers on the net). Start out by looking for band-pass filters that pass HF (3 to 30 MHz), since that will get rid most of the AM broadcasters (unless you live close to a flamethrower), TV, and the VHF/UHF and higher hams. If you're getting CB interference, look for filters that specifically cut that band (they may be called notch filters, band-stop filters, or something else entirely).
If you've got a local ham who's giving you trouble, you'll need to contact him and see if you can talk him into fixing the problem on his end (which he's legally required to do anyway). Hams are like anyone in the general public: many are reasonable and want to do the right thing; but some are irresponsible fatheads who don't give a damn about anyone but themselves. Being diplomatic helps a lot, but if worse comes to worst you can complain to the FCC. If you go that route, start collecting evidence to prove your case (keep a date and time log and, if you can, tape record the interference).
How to contact the ham: licenses are public information, so if you can hear his transmission and get his ID (e.g. KX1XXX), you can look him up at the FCC's amateur license database, and you'll get his contact address.
If the ham is purposely being a pain in the ass, isn't broadcasting his ID, or it's morse code and you can't figure out who it is, try enlisting the help of the local ham club. It's in their best interests to put a stop to this stuff as well. And they may have other suggestions to help you deal with interference.
Other Sites
SWLing.com - I found this website after I began writing this; I like it. You may find it interesting too.
Teak Publishing's Shortwave Central blog - a variety of information on listening on shortwave.