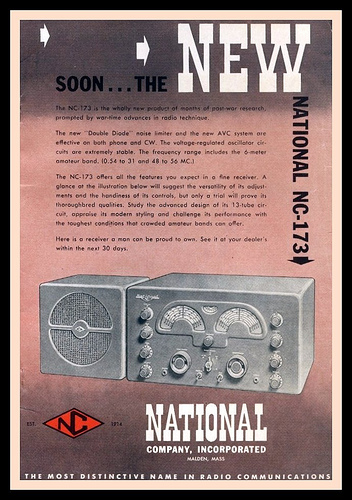
 One of my favorite TV shows is Renovation Realities, which runs on DIY Network in the USA. On the show, a couple tackles some home renovation project on their own, and you watch it unfold, both triumphs and disasters. This is my version of Renovation Realities: I'm going to attempt to bring an old National NC-173 communications radio back to life without burning the house down.
In Renovation Realities form, here are the particulars:
- Project: National NC-173
- Budget: $200
- Timeframe: end of summer (Sept 22, 2011)
As I mentioned on the radio collection page, I like radios in general and old radios in particular; especially ones with tubes. Since tube radios quit being made around the time I was born, if you're going to get these things, you need to learn how to work on them because the number of people who know how are dwindling rapidly.
I wanted a project radio to learn on. I wanted a tube-type, but it's getting hard to find tube jobs, even All-American Fives, at the junk stores anymore. They're all at antique malls where they'll sit for a year at an insane price and nobody seems to care whether they sell or not. The attractive radios are hellishly expensive because they will eventually sell; the affordable ones (not necessarily inexpensive, but affordable) are ugly.
Case in point: currently there seems to be a surfeit of old Zenith K731s, which I think is awful. It's a wooden box with a sliderule dial on the bottom and a rectangular acre of ugly, burlap-colored speaker cloth above it. Yeah, I could buy a couple of those to learn to work on them; and then I'd end up with one-eyed dogs that nobody would want. I ain't that desperate. I'm also very pressed for space, and I don't need any more stuff here unless it's something I really want.
 So I figure if I'm going to lay out money for a project, I may as well pay for something I want to own.
Which leads me to boat anchors. I do love boat anchors. I always wanted a shortwave radio but never really made it happen. When I was young I had a Penneys 4-band radio, the kind that promised a world of exotic listening (aircraft, marine, police and fire!!!) and all I picked up on those bands was noise. I loved that radio but it was good only for commercial broadcast. And I'm sick of broadcast. There are a few things on FM that I like, and I have an excellent GE Superadio III for them. But AM is just a wasteland these days. Once upon a time you could get some decent talk, but now everything's political, and even the guys on "my side" are bilious humps that I can't stand to listen to. That mostly leaves sports talk (almost as bad as the politicos), evangelists (no thanks) and mexican polka music.
Which brings me back to shortwave, and the great spectrum of voice and sound that floats across the ionosphere between mega-dittos and "traffic and weather together on the 7s." I've heard bits and pieces on my Transoceanics, and yes, in between the static and WWV and the infuriating fadeouts, I've picked up foreign-language broadcasts that I can't understand, and the evangelists who somehow manage to boom in when everything else is faint. But I occasionally pick out something that piques my interest, and there's still that optimism that this time, tonight, I'll get something new and different. Something that isn't on 300 affiliates coast-to-coast.
This is my first (but not my last) National, my first real project radio. I've put together kits and I've goofed around with a few. My father's a retired electronics tech so he's my expert backup on all this. But my plan is to try and do as much as possible on my own simply to force myself to learn it.
I don't completely know what I'm doing, but I figure if I work on it methodically, I can do the things that need to be done, and I can ask for help when I hit dead ends.
Documentation
 |
Original owner's manual, includes schematic (3Mb) |
|
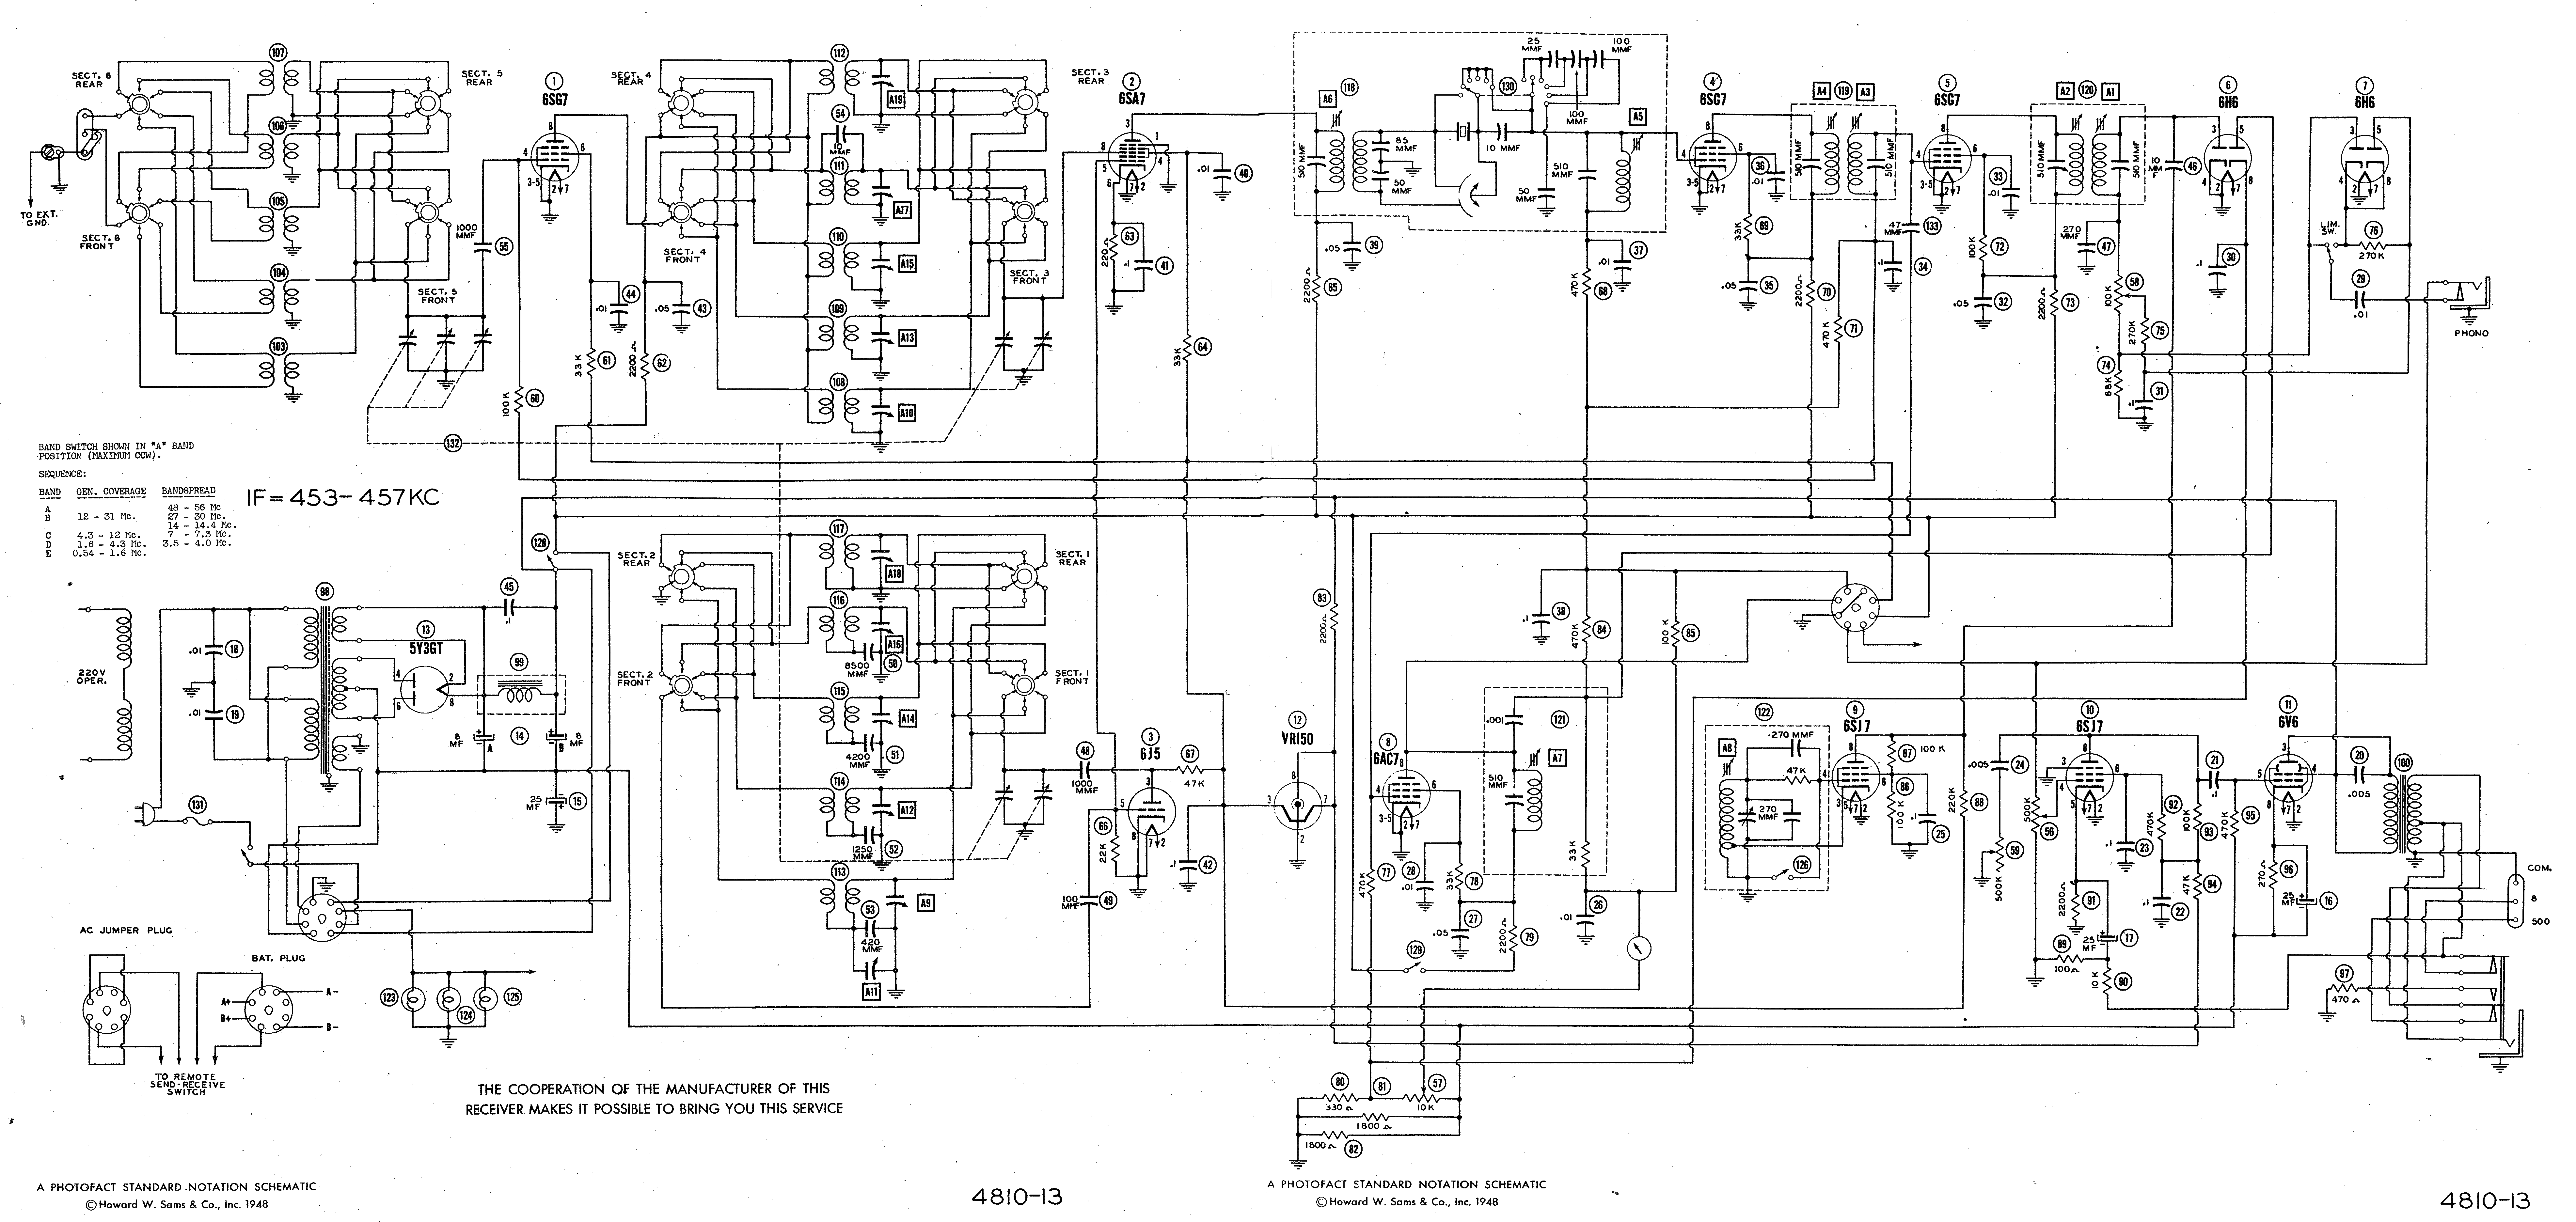
600dpi scan of Photofact schematic (650k) |
|
Riders schematic (1.25Mb) |
Sources
In case you care, I thought the following to be useful or interesting:
March 27, 2011: Baseline
Tube Compliment
6SG7 - RF Amp
6SA7 - Converter
6J5 - Oscillator
6SG7 (two) - 1st and 2nd IF
6H6 - 2nd Detector / AVC
6H6 - Limiter
6AC7 - AVC amp
6SJ7 - BFO
6SJ7 - AF amp
6V6 - Audio out
5Y3 - Rectifier
0D3/VR150 - Voltage regulator
Click on any of these photos to see them in a larger size.
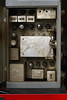
Yes, it's big. About the size of an over-the-stove microwave oven. This is pretty much what it looked like when it arrived on my doorstep. The face is intact (thank God) and the dials work, and hooray!, no dial cords to fight (I once wound a dial cord on my old Penney's 4-bander with a slide-rule dial, and it was nightmarish). But there are definitely some problems. The AF control pot (lower left), aka the volume control, has the shaft broken off and the knob is gone; that'll have to be replaced. The CW and Phasing knobs are gone and the controls have disappeared back into the chassis. I lucked out--the RF gain (it's also the ON-OFF switch)'s knob was missing but that turned out to be wedged in a deep recess of the cabinet. Two of the three dial lights are out, but they take #47 automotive lamps, so I'll see if I can pick a couple up at the auto parts store.
 The back panel looks pretty good—there's not a lot going on here. The big thing is the hole where the stick fuse used to be. That was half-in/half-out, the nut that held it was barely on, and the end of it looks like someone gnawed on it. Why? Who knows. That'll be a quick, early replacement on this thing. Also no AC power cord.
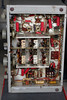
 The top on this unit is hinged, so you can check out the tubes. It's filthy and the dust is stubborn and lazy; I tried a blast of canned air and all I did was make a couple cobwebs flutter. I'll have to clean this up when I get the chassis out of the case. In there somewhere are three 6SG7 amplifiers, a 6SA7 mixer, a 6J5 HF oscillator, a 6H6 limiter, two 6SJ7 oscillators, a 6V6 and a 5Y3 rectifier. That's a fair amount of glass.
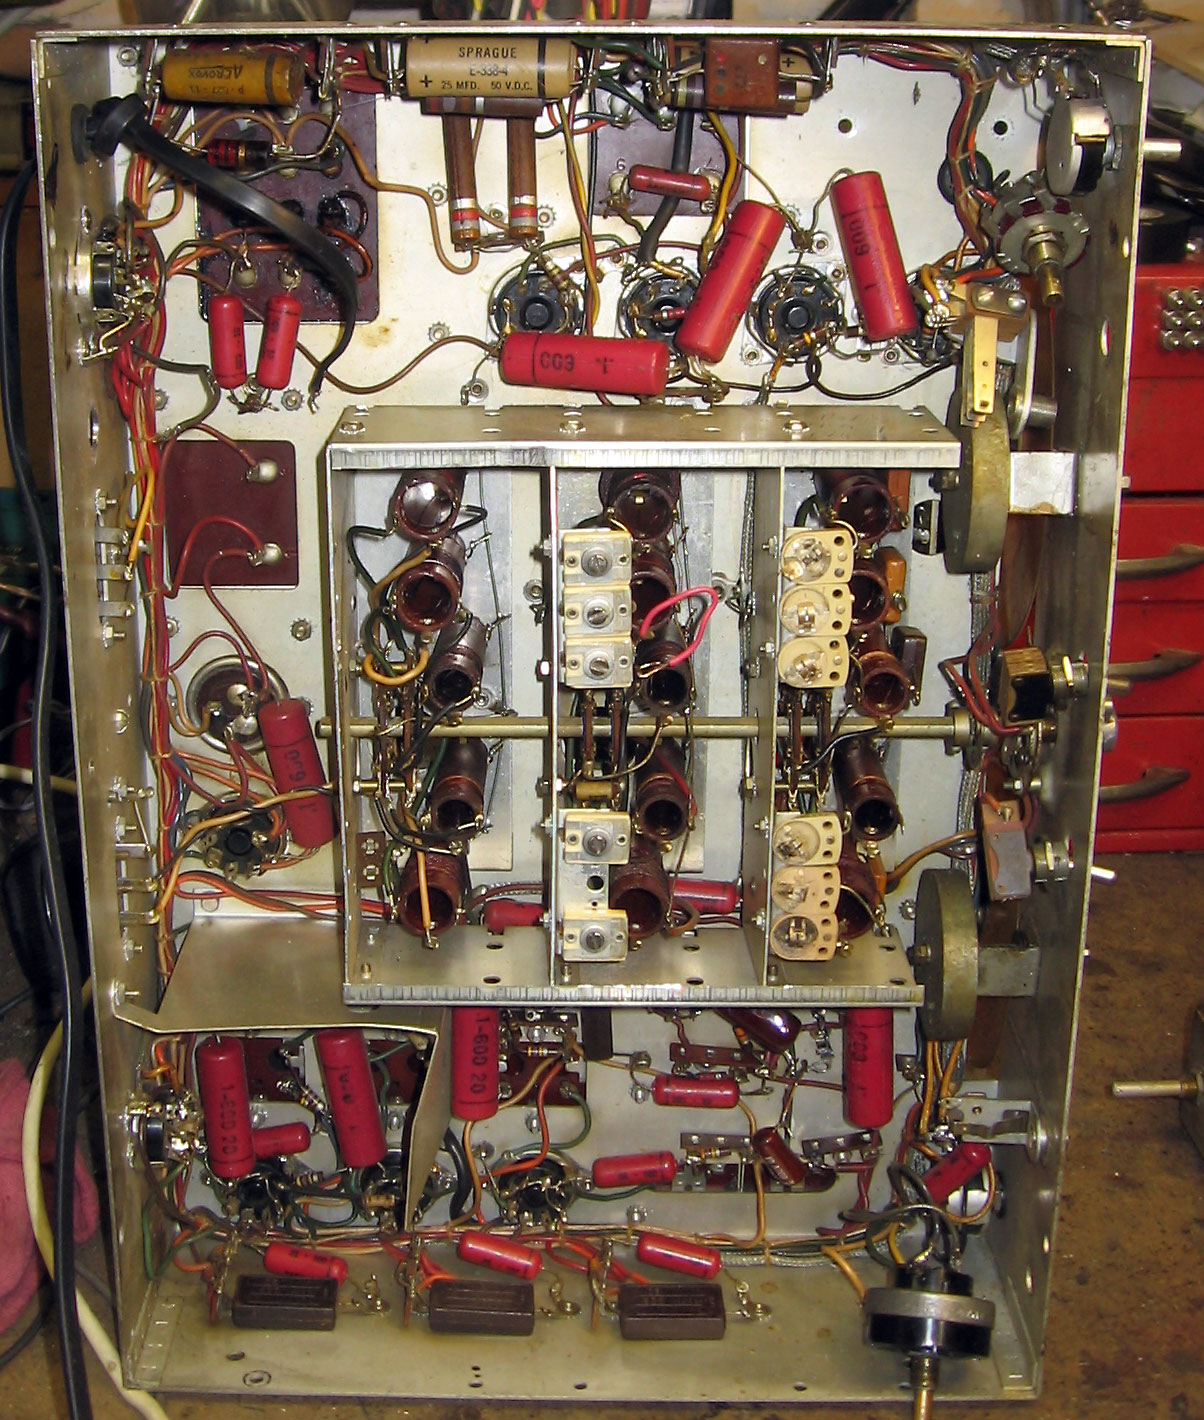
 And finally, the underside of the chassis where the real work is done. It may look like a jumble, but it's surprisingly neat and well ordered. At least compared to some others I've seen. But look at all the paper capacitors. Oy vey. All those are going to have to come out and be replaced with orange drops. The gray 25 mikes are electrolytics and they'll have to come out too. Hopefully the resistors can stay.
I took an old AC cord and stuck alligator clips on the ends (the Old Man calls this a suicide cord), and I was able to power up the unit. I'd like to say that I didn't bother using a Variac to set the caps because I knew the caps were all going to be replaced anyway; but to be honest, I simply didn't think about it. (I also don't have a variac here). Plugged in my high-impedance headphones and tuned across the broadcast spectrum, but nothing. Could be that the broken AF Gain pot (aka the volume control) is full low, but doubt it. Still, if I can find a replacement pot quickly, I'll swap it out and try it again.
Cost: Radio - $67; 1/4" headphone jack (my old headphones are the prong type) - $3
Running Total: $70
So there we are. I've bitten off one big hunk to chew.
Here's the plan as I see it right now (Square 1):
- Remove the chassis from the case
- Clean up and paint the case
- Clean the dirt off the chassis
- Replace the broken fuse tube
- Replace the paper caps
- Replace the electrolytics
- Replace the broken AF Gain pot
- Check out the CW and Phasing controls and see what's going on
- Replace broken dial lights
- Permanently attach an AC cord (it was missing completely)
After that—we'll see if/how it runs.
March 28 - April 1, 2011: Sticker shock
I made up a preliminary list of what I need.
- A SAMS Photofact. I've got the original manual (from BAMA, see links at the top of the page) but the schematic isn't as readable as I'd like it to be. I'm hoping that between the original manual and a SAMS, I'll be covered.
- Original hardware (see below)
- #47 dial light lamps.
- Various modern capacitors to replace the paper and electrolytics. They're available from JustRadios.com.
- AC cord. I'll price it when I figure out which one I want.
- A can of gray paint for the cabinet.
- Fuse holder and fuse (250V, 2A).
Monday I placed the order for the irreplacable original hardware from Radio Boatanchor Parts in Orono, Maine. They scrap out junk radios and sell the pieces you can't get anywhere else. From a practical standpoint, the stuff I bought here won't be needed until I'm nearly done; but it's so hard to find that I was surprised I could get them at all, so I leapt at it because you know what will happen—by the time I'm ready, they'll be gone.
I ordered a replacement for the AF gain pot that was broken, a set of feet (my cabinet's missing one) and the three missing knobs. The knobs were killers at $12 each, but they don't look like anything else I've ever seen, so I can't just pick them up at a shop. Readers who suggest Hamfests may be unpleasantly surprised to know that the local Hamfests in my area have shut down (if there are any, I haven't been able to find them). So I paid about the same for three knobs that I paid for the entire rest of the radio.
I'm not complaining—I'm grateful I found them at all; it's just a comment on the relative value of stuff.
Also ordered a SAMS Photofact off eBay. The local library doesn't have them, and $7.50 (plus postage) doesn't seem bad at all.
On Thursday I went to Fry's Electronics to pick up a fuse holder to replace the broken one that came with the radio. If you're not familiar with it, Fry's is a Radio Shack on steroids. It's a huge store with all kinds of stuff. Like RS, they carry a variety of things from electronic components to complete end units (radios, tvs, appliances, books, magazines, and so on). Unlike RS, they have a wider and deeper inventory.
But Fry's is strange; I often go in for something I swear they ought to have and find out they don't; but then I'll find other things that I would never have guessed. Today they had no fuse holders: the whole section was empty, as if someone swept in and bought every one they had. But then, purely by accident, I found the #47 lamps I need for the dial lights. I thought I'd have to mail order two lights for $3 and have to pay $6 S&H for the trouble. That's Fry's for you.
Friday I ordered the various and sundry orange drops and electrolytic capacitors from JustRadios.com. Hoping they'll arrive by next weekend.
Cost: three knobs, an AF pot, a set of feet: $46 (including s&h); SAMS Photofact: $9; two #47 dial light lamps: $3; various capacitors: $30.
Running Total: $156
Still need to get a 2A fuse holder.
April 2 - 3, 2011: Books
At Rat Shack for something else, so I picked up a fuse holder and a package of fuses. Got home and test fitted it, and now I see what happened to the old one. The hole in the back panel is a shade too small, so whoever installed the last fuse holder whittled the threads down to fit through the hole. So—I can either try to find a fuse holder that is a shade smaller in diameter, or I can ream the hole out.
(Looking for my reamer...)
Meanwhile, as I'm stalled while waiting for capacitors and the Photofact, I've been reading books. I found two that I'm particularly impressed with. They're both available free as PDF downloads from AntiqueRadios.com in their Archives section. The first is Elements of Radio Servicing by William Marcus & Alex Levy (1947), and the other is Inside the Vacuum Tube by John Francis Rider (1945). I find that a lot of technical books from that era read like the small print in the middle of a legal document, but both of these books are very well written. I think Rider over-explains a bit in the vaccum tube book, but he's also making sure that he's clearly understood. I wish the textbook in the introductory electronics class I took had been written by these guys.
Cost: Fuse holder and a package of fuses: $6
Running Total: $162
April 8 - 9, 2011: One G-Damned Knob
The Photofact came on Tuesday. I scanned the schematic at 600dpi and printed it on 11x17" paper, so I've got something I can read without a magnifier. I then laminated it so it'll survive the dirt and grease in the workshop (i.e. garage).
The replacement knobs and such arrived on Thursday from Radio Boatanchor Parts. The feet are different: these are large rubber things, whereas the set currently has three dime-sized discs (the fourth is missing). Not sure which is original, not that it matters a whole lot.
As of Saturday, still no capacitors so I can't recap this weekend. But I decided to try to pull the chassis out of the cabinet. All but one of the knobs came off without too much trouble, but I'm stuck with the band-selector. The set screw just does not want to come out. Put some Liquid Wrench on it (along with various spritzes of WD40) but no luck. Rapped it with a hammer (using a suitable buffer so I don't ding it) from various angles, even tried pulling the thing off with a wrench (and some rubber padding to keep it from marring the surface—which wasn't quite as effective as I'd like; hopefully I can buff it out later. If not, then it's character). I even put a drop of acetone in the set-screw hole hoping it might dissolve thread-lock glue, in case a previous owner had used it. Still can't get it out.
Finally decided to try to pry it off with a screwdriver. At first I thought it was actually working, but it's just pulling the entire metal shaft out with it. Two ball-bearings that serve as the detent-stops fell out, so I'm not officially dead in the water. I'm stalled until I figure out how to get the last knob off.
Cost: nothing new
Running Total: $162
April 17, 2011: Some Idiot
 If you watch Renovation Realities, this is the part of the show where the guy gets on the phone and calls in expert help. In my case, my father, the retired electronics tech. I went up to visit for other reasons, so I brought the radio along with me.
We got the knob off by heating it with a butane torch, which sufficiently loosened the set screw. I didn't do this at home because I was afraid of bubbling the paint and making the cabinet worse; the old man wielded the torch and I held a piece of scrap sheet metal across the face to act as a sort of heat shield.
With the knob off, the chassis came out and cursing began. I once heard a comedian mention this and it's absolutely true: every repair guy looks at a project and invariably says, "who worked on this thing before? Look at what this idiot did!!!" First up was a missing c-ring that goes on the band switch shaft to keep it from pulling back into the chassis. We had no replacement so he fashioned one out of heavy wire. The ball-bearings that fell out (that was my doing) were reseated. We wanted to clean it up, but my father couldn't find his can of tuner cleaner, and of course I left the new one that I'd bought at home. Item #1 on my new shopping list.
Next up was replacing the broken AF Gain pot. That went relatively easily. Glad I paid the $3 to the junk parts guy for it.
Then we moved to the phono input plug; two wires and a capacitor all go to this thing, and one wire and the cap were loose. Did some tracing to verify where each hooked up (plus we didn't trust the previous owner). So that's in.
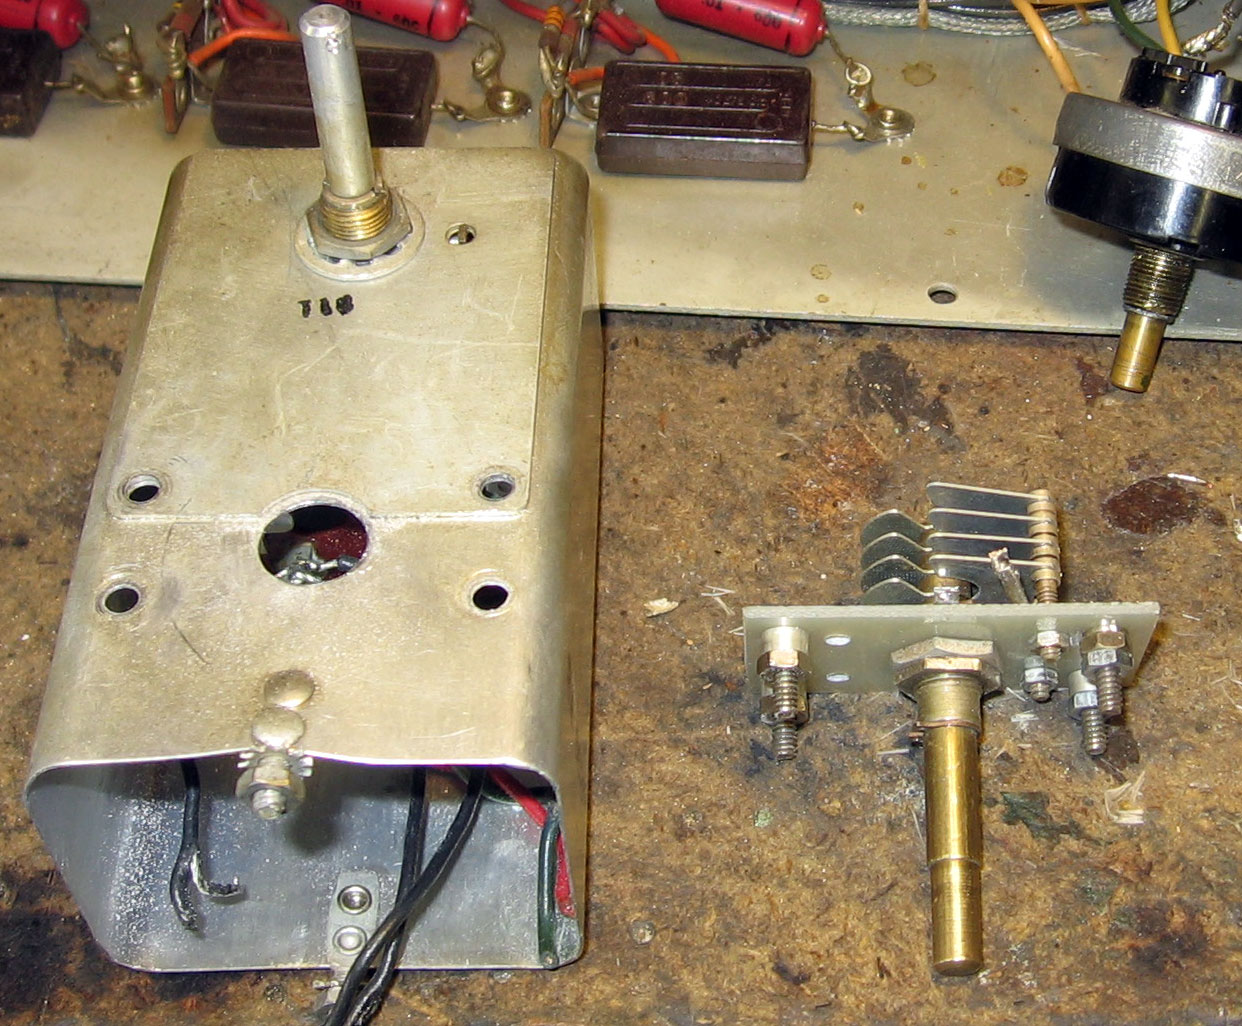
Then my dad pointed out the RF Gain pot, which was a little crooked. "See how all the shafts out front are all parallel but this one is a little off?" I hadn't noticed it before. But you look in the back it's obvious what happened. Pots usually have that little nub that comes out that fits a hole in the panel and keeps the pot from turning. There's no hole in the chassis for it, so rather than just bend the nub down like any normal person, he just left it, which meant the pot couldn't seat flat against the panel, and the shaft stuck out crooked.
Pulled the pot and bent the nub down. Then my father says let's check it, because you never totally trust the competance of previous work done, especially someone who does something like this. The schematic and parts list call for a 10kΩ pot. This one was a 1k. Checked it on my father's trusted old RCA VTVM and again on a digital meter. It's a 1k.
We don't have a 10k on/off linear taper pot in the junk box, so that's #2 on the shopping list.
So we moved to the back of the cabinet to put in a new AC cord and the new fuse holder. Reamed the hole out a skosh to fit it properly. Wired it up (with a double-check of the wiring). Then as I'm putting the fuse in—a little piece of plastic broke and that was the end of that. Rooted through the junk box, no 2A fuse holders. #3 on the list.
Fit a dial light in for the one that's missing and checked the other two bulbs. They're good.
A look over the bottom of the chassis and my dad found a broken connection between a cap and a wire and a ground point. He believes the guy hooked it up, meant to solder it down and forgot. And we should verify that he put in the right cap, et al.
Then a wail. My dad pointed to a trimmer that looked like it had been messed with. What if the guy tried to align it???
More cursing: for whatever reason, the nut that held the CWO cap in place was missing and it pulled back and is swimming in a shielded enclosure. I thought it was a matter of taking out a couple screws and popping the can out and reseating it, but no, it's a tougher job. Since I have no interest in listening to code, we're going to try to just grab it, put the nut on it and get it reseated without opening up the can. But not tonight.
Finished up by checking the tubes on my father's hold Hickok tube checker. One 6SJ7 was on its deathbed and was replaced out of stock. Another 6SG7 is weak but we had none to replace it with. My father says I'll probably never notice the difference; I'm sure he's right but I may buy one anyway. It's one of the easiest ones to swap out.
So that ended the evening. I'll add costs for new parts as I buy them.
Cost: nothing new
Running Total: $162
April 18, 2011: Rebuilding the Can
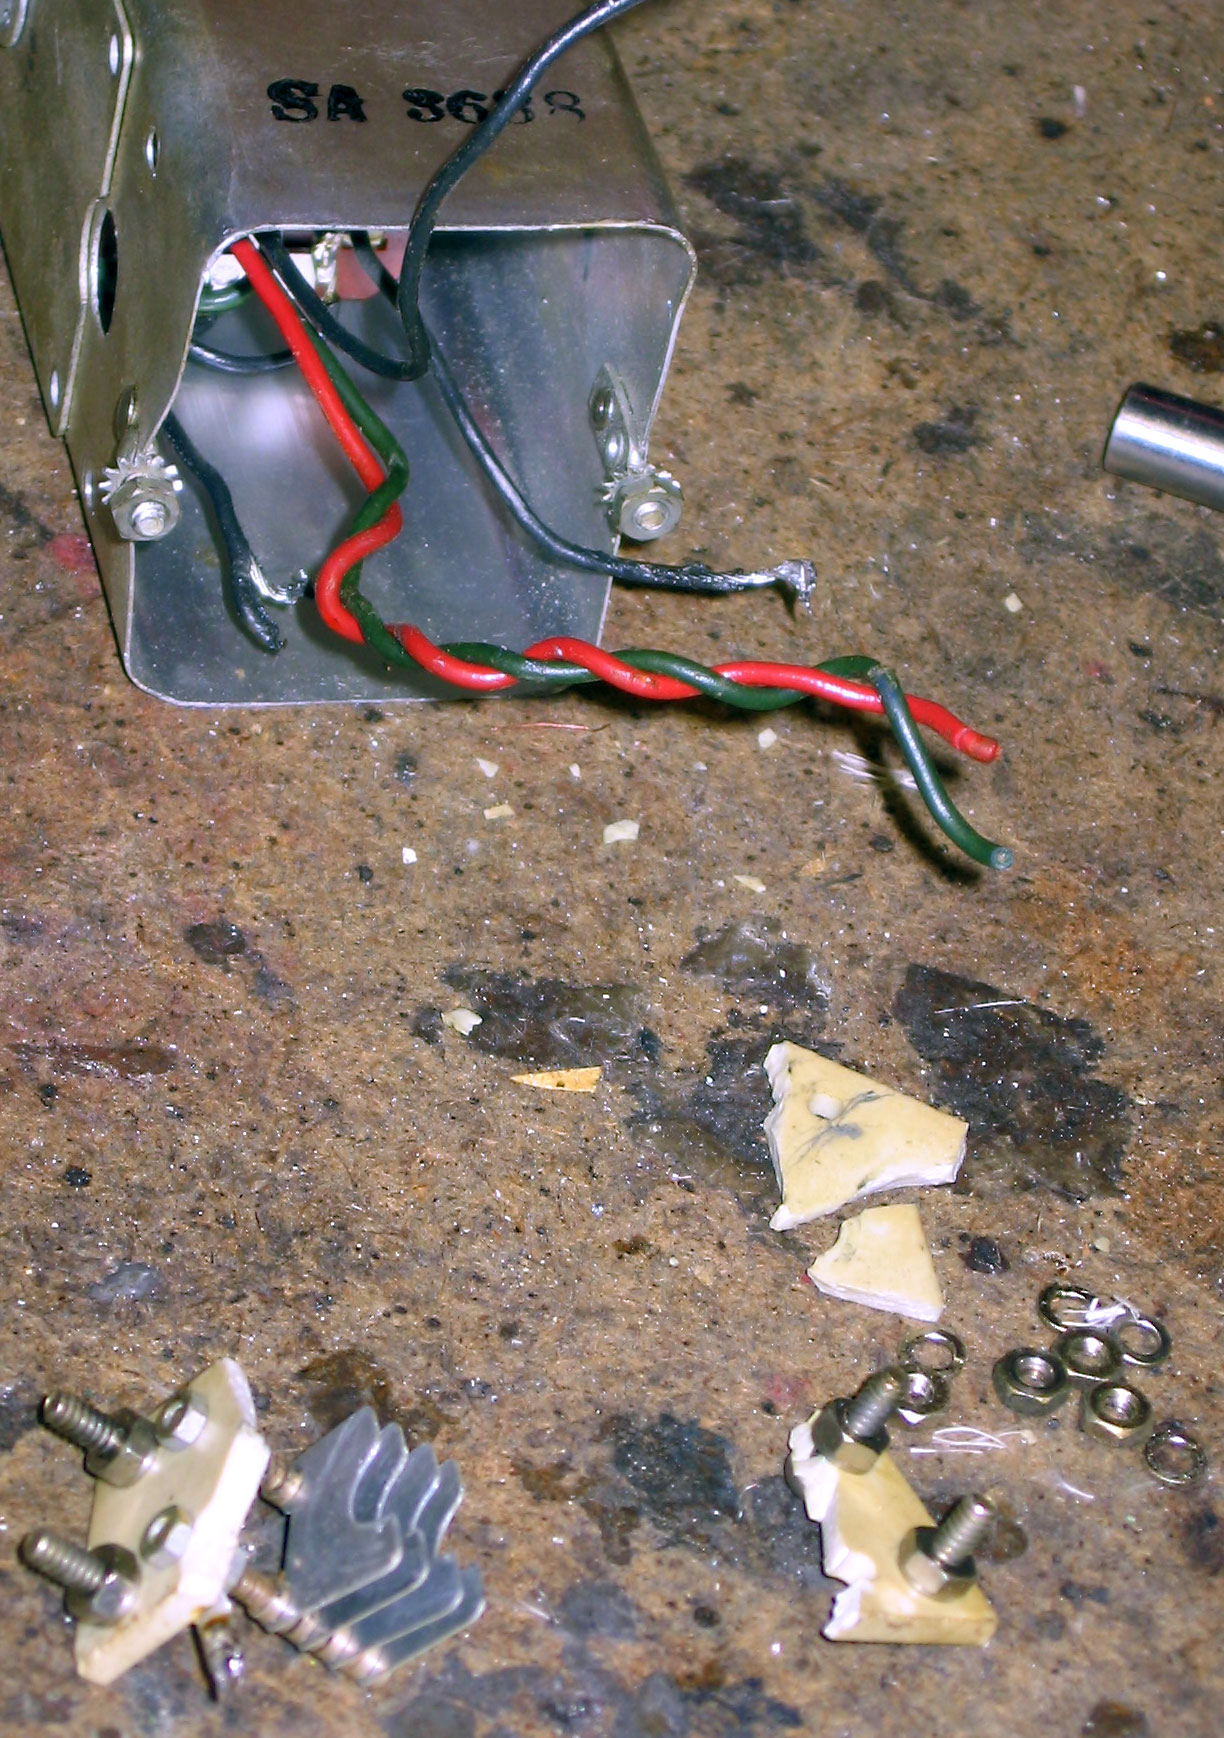 The CWO control defied a quick fix, so we marked and cut the three wires to the chassis, took out the screws and removed the whole can. The truth came out in pieces: the CWO control is an air-variable pot and it must have been smacked with something. The porcelain (or whatever it is) base was shattered. As always, you can click on the images to see larger versions.
 My dad went to the local computer graveyard and picked up a chunk of what I guess is scrap fiberglass. He used the broken pieces as a template and drilled holes, reassembled the cap and straightened out the bent fins. The result was better than anything I would have expected from what I saw earlier.
Once the can was reassembled, we put the can back in and resoldered the wires. Tomorrow hopefully I'll pick up the new RF gain pot and fuse holder.
Cost: fiberglass insulator (gratis)
Running Total: $162
April 19, 2011: Wonky but Nothing Explodes
Picked up the new pot and a fuse holder at Fry's. The fuse holder went in without drama, but that would be the last easy thing we'd do today.
First I put in the new pot, which is much smaller and a bit of a struggle. The nut to hold it didn't quite fit, or maybe the threads are fouled; it took a lot of searching to find another nut. Finally got it in and my dad's looking at the old one, and remarks how much larger the original is. "Is this wire-wound?" It was. The original's a 1.5 watt pot; I looked on the card for the new one and it's a 1/2 watt job.
But luckily, as I'd double-checked the value on the new pot and determined it really was a 10kΩ pot, I'd looked again at the original and it was truly a 10k as well. I'd misread the meter. We'd both misread the meter. Or gremlins switched the pots in the middle of the night.
Either way, I put the old one back in. All told, that's about an hour of my life wasted. Less than I spent in the theater watching Titanic, but about as pleasant and fulfilling.
Tacked down the cap that had been floating around, and we're finally able to power up.
Now the fun begins. We ran it through a variable power supply to slowly bring it up: dead. Began tracing. Much grousing over the SAMS schematic because they count the pins on the octal power plug counter-clockwise. Anyway, long story short, I had inadvertantly swapped two gray wires on the On/Off-RF Gain pot (the one that came out, was replaced, and then put back again).
The idiot is me.
With the pot finally wired properly, we get power. Finally bring it up to full line voltage and no explosions, no smoke. Woo Hoo!
We let it warm up and began hunting for a signal. For a short while I thought it was still dead, but then managed to pick up a foreign language broadcast. No idea which band I'm on or how accurate the indicator (which is printed on a big disc) was. My dad hooked up his beloved old Hickok 288X signal generator, which he claims is as solid and dependable as The Rock, and we tried to find the frequency.
Couldn't do it. More searching, and I found what I thought at first as english-language lessions, the words were coming out so slow, but it turned out to be an evangelist. Figures. For some reason, God gave all shortwave preachers 100kW transmitters that sound as if they're parked 3 blocks away.
My dad thought that was 1600kc, a local catholic church broadcaster, but couldn't zero-beat it with the signal generator; I finally pulled out another radio (a Hallicrafters TW-500) and brought up 1600. Different broadcast.
More band switching and hunting until I could bring the pope's radio in on the National. So now we knew where we were on the dial (which was a bit off). And adjustment on the signal generator. Still nothing.
My dad switches to 455kc and tries to hit the IF. No. It appears that for the first time in 60-some years, the Rock ain't running.
So now we switch over to the B&K unit, which does about 10 different things, none of them well, according to my dad. More fussing and cursing, but finally got something. We're going to have to align this thing.
The first few steps involve putting the signal generator on the tuning cap and adjusting across the top of the unit. That went fairly well. Then it came time to flip it over, hook up to the antenna and adjust the trim pots, and that was a fiasco. But at this point it was getting late and we shelved it for another day.
Cost: fuse holder: $2.50 (I'm not going to count the pot—it can go in the junk box for something else.)
Running Total: $164:50
April 20, 2011: Hiatus
Work is halted while we try to figure out what ails the signal generator.
Cost: nothing new
Running Total: $162
July 2, 2011: Progress Report
 I got an email from another NC-173 owner, so I now know someone reads this page. I've seen a number of websites that end abruptly, and I don't want this to be the same way. Here's where I am as-of today.
The radio's still sitting in my father's garage. I've got some vacation time coming up soon so I'll be visiting, and hopefully we can get it finished off, and still on-schedule for end-of-summer.
In the meantime, he was able to fix the Hickok signal generator (appears there was some unsoldered connection that was there from day one, but for whatever reason it had never come loose until now. Go figure), so the alignment can begin.
I also picked up a "matching" speaker. I put quotes around it because I think the color is off. The previous owner restored it—the speaker is new, the grill cloth is new, the paint is new and the NC logo is missing. Either he painted it the wrong color (dark brownish gray) or it's the proper color to match another model. Either way, I'm going to try and to repaint it and match it against my radio. Also bought a National logo. It's the wrong one, but that's not terribly important to me. If it doesn't look right, I'll print out a logo, glue it on a piece of aluminum, and stick that on. Anything to cover the empty hole. My father used to cast jewelry, so I'm going to see if maybe we can duplicate the badge I've got.
Cost: I'm not counting the speaker and logo badge.
Running Total: $162
December 20, 2011: Back on the Bench
FINALLY! Got it out and set it up on the bench. (Don't ask me where Summer and Fall went). Couldn't remember where we'd left off other than problems with the signal generator. So we just fired it off to see. Plugged in the National speaker I'd bought, which turned out to be shot. Replaced it with one out of the junk box. I'll have to look around for a decent 6" 8Ω speaker.
Tuned for broadcast, voice garbled. Found a couple more poorly connected caps. Soldered them back down properly and got good audio. That's all we could do today.
Cost: nothing new
Running Total: $162
December 21, 2011: Greetings From El Jefe
Alignment turned out to be a lot less dramatic and infuriating than last time. The IF cans are all on top and easy to get to; the trimmer caps are all on the bottom and easy to access. Unfortunately, one of the trimers was broken and fubar'd. It had been patched by a previous owner but now broke completely when we tried to
adjust. Did our best to glue the mica with superglue, trimmed acceptably well. The rest of the bands went along without incident.
Picked up broadcast, but big deal; the whole point was searching the ether for the stuff you can't get on the kitchen radio. None of us have a proper SW antenna; we're using clip leads from the antenna connection to the corner of a tool box. Yet we picked up Radio Havana Cuba on 6MHz. We got the english language broadcast—thankfully missed Raul's condolences to the people of North Korea for the loss of Kim Jong Il.
Cost: nothing new
Running Total: $162
December 24, 2011: T'was the Night Before Christmas
The speaker cabinet I'd bought was a brownish gray and I wanted it to match my set. The local hardware store had "stainless steel" gray, which is close enough. It won't fool anyone but at least it's in the ballpark. We wrestled the radio back into the cabinet and did our best to figure out where the knobs went. If you recall, I was missing some at the beginning, the diagrams in my downloaded owner's manual are too small to tell, and photos of other NC-173's on the net, to put it politely, do not render enough detail. I ended up with a knob that has a 180° throw, a 0 in the center and 1 to 5 in each direction, and I had no idea where that went. I now think it's the phasing control (right now it's on the audio gain pot), so I'll swap it and get some photos of it in-detail for upload.
Also painted the back and top cover panels of the cabinet, which were heavily scratched. I'm happy with it; this is not going to be a museum piece.
Ran a about 15 feet or so of wire out to improve our antenna. Not much on the other bands, but 40 meters was alive. Picked up Catholic radio out of Birmingham, Alabama (I'm in California) and a couple evangelists; Radio China out of Beijing (the BBC and the VOA are cutting back, but the communists love world band radio). Picked up a couple languages even my sister the linguaphile didn't know. A spanish-language broadcaster was playing English-language records, including Snoopy's Christmas, which I hadn't heard since I was a little kid (I used to have that album). Fitting for Christmas Eve.
Stayed out in the dark, trying to tease voices out of the noise and learning how to run the various controls, until it was time to bring in the brass monkeys.
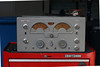
As they say on the show, This Restoration is Complete.
Cost: a can of "stainless steel" gray paint - $5
Running Total: $167
Time frame : about 3 months late, but still within calendar 2011
P.s. I have no room anywhere to set this thing up.
Saw the new Kon-Tiki movie. It's a dramatization of the expedition. Not great, but not bad. They took a lot of liberties but they did get the radio right. So if you watch the movie, there are three or four scenes with this beast on-board.
Current status: this radio is no longer in my collection. This page will be removed in late 2024.